

HomerPunks Tutorials
Below are tutorials for buying/selling and moving HomerPunks and HomerStamps with Bitcoin wallets.
First, what are HomerPunks on BitcoinStamps:
A BitcoinStamp is essentially an image converted to Base64 and then the Base64 string hashed onto Bitcoin in Bitcoin’s UTXOs that are then represented by a single token that ties them together – in this case, an ‘A’ number token, eg. A247404247404247404, that can be then bought and sold/moved.

Buying HomerPunks
For most, Leather Wallet is a good entry wallet for BitcoinStamps. Download Leather here – verify the address in your browser is: https://leather.io/
1. After downloading and installing in your browser, create a new wallet. You’ll need a pen and paper to write down your 24 word wallet key. IMPORTANT… The 24 word mnemonic is your Bitcoin wallet and all the addresses are generated from it, lose it and you lose everything. Do not write it in your pc/store online. Leather will also ask you to create a password so you can prevent others opening your wallet.
(Note: If you ever lose your password but still have your 24 word mnemonic, you still have your wallet and all the addresses, Bitcoin and stamps)
2. Fund your new Bitcoin wallet in the usual way by clicking ‘receive’ to get your address and send some Bitcoin to that address.
3. After several confirmations, you now have a couple of choices, buy HomerPunks from StampedNinja or OpenStamp. Let’s try StampedNinja first…
4. Buying from StampedNinja: Go to the HomerPunks collection page here and then connect your Leather wallet by clicking on the ‘Connect’ button in the top right.

5. Choose ‘Leather’. You will then be asked to sign a transaction. This is just to give permission to Stamped.Ninja so you can use your wallet with the platform. No Bitcoin will be used.

6. You will then see the top right button turn blue. You can click it and see your address. After finishing viewing it, close it by clicking the ‘X’.

7. Click on the ‘Buy’ button of the HomerPunk you want, and you will be presented with the Bitcoin price for the HomerPunk and the fees used. Make sure you have enough Bitcoin in your wallet to cover the price and fees, and click buy when you are happy with the price and estimated Bitcoin fees.

8. Congratulations, you’ve just bought your first HomerPunk! The HomerPunk will arrive in your Leather wallet usually within one Bitcoin Block (10 minutes~) and you can see it here in your Leather wallet…

9.Buying from OpenStamp: Go to HomerPunks collection page here and then connect your Leather wallet by clicking the ‘Connect’ button on the top right (if your Leather wallet is already open, make sure you are already in the wallet address you wish to use, as that’s the one that’ll connect). Then choose, ‘Leather’.

10. You will then be asked to sign a transaction so you can use Leather wallet with OpenStamp the same as with StampedNinja. This permission does not use any Bitcoin.
11. After you have done so, you will see the top right button change to your address. Choose the HomerPunk you want to get and click the ‘Buy’ button and then the buy menu will pop-up with the price plus the transaction fee. (Note: On OpenStamp sometimes multiples of the same HomerPunk are sold together, so check the quantity amount first.)

12. Check the transaction fee is okay by selecting your fee amount (‘Standard’ is usually fine but may take a bit longer than ‘High’, depending on how busy Bitcoin is). Then click ‘Confirm’.
13. You will then be asked to confirm once more in your Leather wallet. You’re done! Now sit back and wait for your HomerPunks BitcoinStamp to appear in your Leather wallet and welcome to the club!

Selling HomerPunks
For selling, we are going to use Leather wallet again: https://leather.io/
1. Selling on OpenStamp is the easiest option: Follow the same steps for buying HomerPunks on OpenStamp by connecting your Leather wallet and signing a permission transaction.
2. Click on your address where it now appears on the previous connect button.

3. You will then be taken to a page that shows the stamps that you own. Mouse-over and click on the ‘List for sale’ button.

4. You will then see a pop-up menu that shows how many stamps of that type you have to sell and allows you to input how many you wish to sell and the price you wish to sell it for.

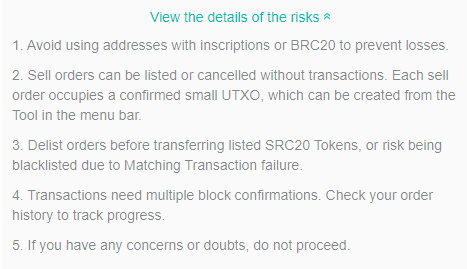
5. Be sure to ‘view the details of the risks’ before you proceed.
6. If everything looks good, check the box and click the big green ‘confirm’ button. You’re done! You can check back on the HomerPunks collection page to see your HomerPunk for sale.
1. Selling on StampNinja: To sell a Stamp on StampedNinja is a bit more complicated. You cannot sell stamps via the previous ‘connect’ button you used to buy stamps on StampedNinja with Leather wallet (as far as we know). Leather provides a 24 word mnumonic whereas StampedNinja only allows for 12 word mnumonic input in ‘Ninjawallet’. In other words, you currently cannot use Leather wallet to sell your stamps on StampedNinja. If you wish to sell your stamps on StampedNinja and have a 24 key instead of a 12 word key, your only option is to move your stamps to a wallet that does have a 12 word mnumonic (Unisat wallet, for example – see ‘Moving your HomerPunks’ tutorial in the next section)
2. Assuming you have a 12 word mnumonic key, then click ‘Ninjawallet’ at the top menu bar, and after click the blue button ‘Login to Existing Wallet’ and input your 12 word mnumonic. Note: your 12 words stay on your client side and are not kept by them. But use your own due diligence in your actions..
3. When you logged in, you will either see your address with your HomerPunks/HomerStamps, or you will need to populate your addresses until it appears. Do this by clicking ‘ADDRESSES’ in the pull-down menu.

4. Then click the blue button ‘+ ADD ADDRESS’ to find the address with your stamps. After the address you want has appeared, go to the drop-down menu again and click ‘DISPENSERS’. Then, click ‘Create Dispenser’ and you should see similar to the image below…

5. When you have set the amount to escrow for sale as individual stamps and the BTC price, click the blue button ‘Estimate’ to estimate the miners fee. If the amount is acceptable, click the now blue button, ‘Broadcast’. After a few block confirmations (or two) you will see your stamp for sale on the collection page for HomerPunks/HomerStamps!
Moving HomerPunks
Currently, the easiest option for moving your HomerPunks/HomerStamps is via using the OpenStamp platform…
1. Transferring your HomerPunks using OpenStamp: Follow the same steps for buying HomerPunks on OpenStamp by connecting your Leather wallet and signing a permission transaction.
2. Click on your address where it now appears on the previous connect button.
3. You will then be taken to the page that shows the stamps that you own. Mouse-over and click on the right ‘…’ to reveal the ‘Transfer’ option and click it.

4. You will then see a pop-up menu that allows you to choose how many HomerPunks/HomerStamps to send, and the input box where you will put the receiving address.

5. After exactly cutting and pasting your receiving address in the receive box, choose your miner’s fee and then click ‘Confirm’. You’re done! Important: Only send a BitcoinStamp to a compatible Bitcoin address. Technically, you could have a BitcoinStamp at most types of Bitcoin Addresses except a Taproot address, the most common address beginning with ‘bc1q… ‘. In practice though, it’s just easier to have your HomerPunks easy to find in Leather or Unisat which use Segwit (the same address generated in Leather that receives your Bitcoin.)
6. To find a receiving address in Leather, click ‘Receive’ in the usual place, then click the ‘Collectibles’ tab and copy the address (as previously stated, it’s just the same address as the common Leather Bitcoin address.)
